How to Fix Foundation DIY: Safe Repairs, Methods & When to Call a Pro

Foundation Repair Cost & Method Calculator
Estimate the cost of DIY foundation repairs based on crack type and size. This tool helps you decide between epoxy injection, carbon fiber straps, or professional consultation.
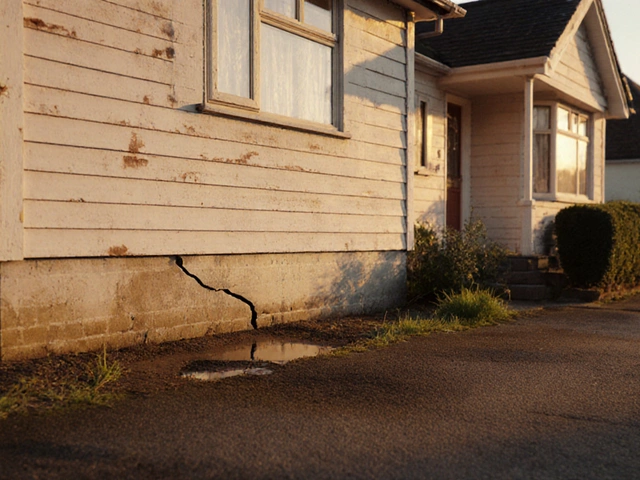
Cracks in your basement walls or uneven floors are not just eyesores; they are warning signs. A shifting foundation can compromise the structural integrity of your entire home, leading to expensive repairs down the line. While major structural failures require heavy machinery and engineering expertise, many minor foundation issues can be addressed with DIY foundation repair techniques. Knowing the difference between a cosmetic nuisance and a critical failure is the first step in saving money without risking safety.
Before you pick up a trowel or drill, it is crucial to understand what is happening beneath your feet. Most residential homes sit on one of two types of foundations: poured concrete slabs or concrete block (CMU) walls. Each reacts differently to soil movement, water pressure, and temperature changes. Identifying your foundation type determines which repair method will actually work.
Diagnosing the Problem: Is It Really the Foundation?
Not every crack means your house is sinking. Hairline cracks-those thinner than the width of a penny-are common in new construction due to concrete curing and shrinking. These rarely affect structural stability. However, cracks wider than 1/4 inch, stair-step patterns in brickwork, or horizontal cracks in basement walls indicate significant lateral pressure or settlement that needs immediate attention.
To diagnose accurately, look for these secondary symptoms:
- Door and Window Misalignment: If doors stick or refuse to latch, the frame may have shifted out of square.
- Floor Slopes: Place a marble on the floor. If it rolls consistently in one direction, your slab has settled unevenly.
- Gaps Around Windows: Visible separation between the window frame and the drywall suggests the structure is moving.
- Exterior Cracks: Check the siding and brickwork outside. Diagonal cracks radiating from corners often point to foundation distress.
If you notice any of these, document them with photos. This record helps track progression over time. For those living in high-maintenance urban environments where property values hinge on pristine condition, keeping detailed records is even more vital. Just as one might rely on verified directories like this resource for reliable local information, homeowners need trusted methods to assess their property's health accurately.
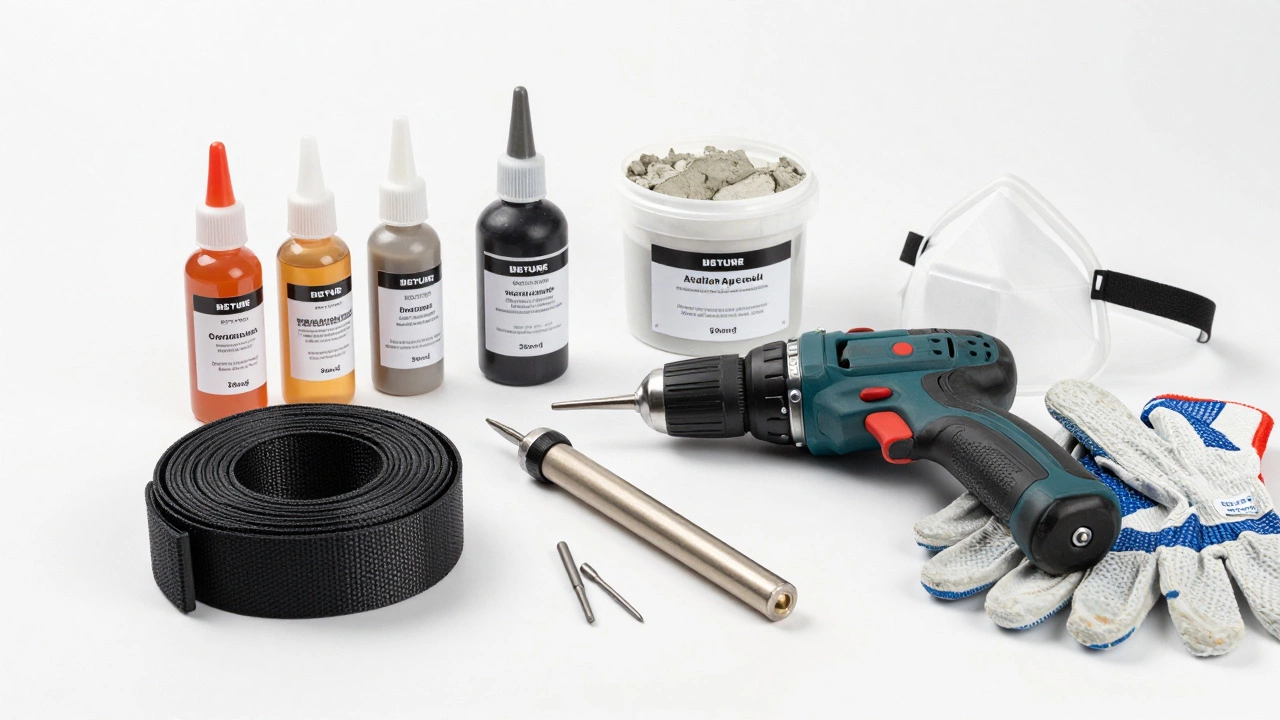
Tools and Materials You Will Need
You do not need a full contractor’s toolkit for basic repairs, but having the right equipment makes the job safer and more effective. Here is the essential list:
- Epoxy or Polyurethane Injection Kit: Available at most hardware stores, these kits come with resin, a pump, and injection ports.
- Hydraulic Jacks and Shims: For lifting sagging beams or joists temporarily during repair.
- Masonry Drill Bit and Hammer Drill: To prepare surfaces for anchors or cleaning out cracks.
- Concrete Patching Compound: For filling larger voids after structural stabilization.
- Safety Gear: Gloves, goggles, and a dust mask are non-negotiable when working with concrete dust and chemical resins.
Method 1: Injecting Epoxy into Structural Cracks
Vertical or diagonal cracks in concrete walls can be sealed and strengthened using epoxy injection. This method restores some structural integrity by bonding the split concrete back together. It works best for cracks that are not actively moving-if the crack is still widening, injection alone will fail.
- Clean the Crack: Use a wire brush and compressed air to remove loose debris. The surface must be dry for the epoxy to adhere.
- Install Injection Ports: Attach the plastic injection nozzles along the length of the crack, spacing them about 6 to 12 inches apart. Seal the gaps around the ports with epoxy paste.
- Pump the Resin: Starting from the lowest port, inject the epoxy slowly. Watch for the resin to seep out of the next port up. Once it does, seal that port and move to the next.
- Cure and Trim: Let the epoxy cure for 24 hours. Then, snap off the injection ports and grind the surface smooth.
This process stops water infiltration and adds tensile strength to the wall. However, it does not lift the foundation. If the wall is bowing inward, you need a different approach.
Method 2: Stabilizing Bowing Walls with Carbon Fiber Straps
Bowing walls are caused by hydrostatic pressure from saturated soil pushing against the foundation. Unlike steel I-beams, which require drilling large holes and welding, carbon fiber straps offer a less invasive DIY-friendly solution for mild to moderate bowing (up to 2 inches of deflection).
- Prepare the Surface: Remove paint, efflorescence, and loose material from the wall. The surface must be bare concrete for the epoxy adhesive to bond.
- Apply Epoxy Adhesive: Spread a thick layer of structural epoxy onto the vertical strips of carbon fiber fabric.
- Mount the Straps: Press the straps firmly against the wall in a vertical pattern, typically spaced 16 to 24 inches apart. Use clamps if necessary to ensure contact.
- Reinforce Top and Bottom: Add horizontal strips at the top and bottom of the wall to anchor the vertical straps.
Carbon fiber has a higher tensile strength than steel by weight. Once cured, these straps act like an exoskeleton, preventing further inward movement. This is a cost-effective alternative to installing steel beams, which often requires professional installation due to the precision needed for load-bearing connections.
Method 3: Leveling Uneven Slab Floors
If your issue is a sloping concrete slab rather than a wall problem, self-leveling compound can restore flatness. This is primarily a cosmetic and functional fix for interior spaces, not a structural lift for the entire house.
- Assess the Slope: Determine the highest and lowest points. Self-levelers work best for variations under 1/2 inch over a 10-foot span.
- Prime the Concrete: Apply a concrete primer to open the pores and ensure adhesion. Skip this step, and the compound may delaminate.
- Mix and Pour: Mix the self-leveling compound according to manufacturer instructions. Pour it starting from the lowest area, letting gravity spread it toward the high spots.
- Spike Roll: Use a spiked roller to eliminate air bubbles and help the liquid flow evenly.
For severe settling where the slab has dropped significantly, mudjacking (slab jacking) is the traditional remedy. While some DIY kits exist, controlling the pressure and mix consistency is difficult. One wrong move can cause the slab to heave too high, creating new problems. In such cases, hiring a pro is usually worth the investment.

Preventing Future Foundation Issues
Repairing a crack is useless if the underlying cause remains. Water is the enemy of foundations. Saturated soil expands and contracts, exerting pressure on walls and causing slabs to sink. Proper drainage is the single most effective way to protect your investment.
- Extend Downspouts: Ensure rainwater flows at least 6 feet away from your house. Use splash blocks or underground piping.
- Grade Your Yard: The soil around your foundation should slope downward away from the house. Even a slight grade prevents pooling.
- Install French Drains: If you have chronic basement flooding, a perimeter drain system can redirect groundwater before it hits the walls.
- Trim Vegetation: Large trees near the foundation absorb massive amounts of moisture, causing soil shrinkage. Keep roots at least 10 feet away from your home.
When DIY Becomes Dangerous
There is a fine line between a smart weekend project and a catastrophic mistake. You should stop immediately and call a structural engineer or licensed contractor if:
- The crack is horizontal and wider than 1/4 inch.
- You hear popping or cracking sounds coming from the walls.
- The floor slope is severe enough to feel unsteady when walking.
- Multiple stories of the house are affected simultaneously.
Structural failures can happen quickly. Ignoring major red flags to save on labor costs can lead to collapse risks, insurance claim denials, and plummeted property values. Always prioritize safety over savings when dealing with the bones of your home.
Can I fix a foundation crack myself?
Yes, for small, non-structural vertical or diagonal cracks less than 1/4 inch wide. Use epoxy injection kits to seal and strengthen them. Avoid DIY for horizontal cracks or active movement, as these indicate serious structural issues requiring professional intervention.
How much does DIY foundation repair cost?
Basic epoxy injection kits range from $50 to $150. Carbon fiber strap systems can cost between $200 and $600 depending on wall size. Compare this to professional rates, which often exceed $5,000 for similar minor repairs, making DIY a significant money-saver for eligible projects.
Is carbon fiber stronger than steel for foundation walls?
Carbon fiber has a higher tensile strength-to-weight ratio than steel. It is excellent for stopping further bowing in walls with minor deflection. However, it cannot push a bowed wall back into place; it only stabilizes it. Steel beams are better for correcting significant displacement but require more invasive installation.
What causes foundation cracks in the first place?
Common causes include soil expansion and contraction due to moisture changes, poor initial compaction, tree root intrusion, and hydrostatic pressure from groundwater. Proper drainage management is key to preventing these issues from worsening.
Do I need a permit for DIY foundation repair?
It depends on local building codes. Cosmetic patching usually does not require a permit. However, structural modifications like installing carbon fiber straps or altering load-bearing elements often do. Always check with your local municipality before starting work to avoid fines or insurance complications.