Unlocking the Cost of Loft Conversions: What's the Most Expensive Part?

Planning to turn that dusty old attic into usable space? Well, you're not alone. A loft conversion is one of the smartest ways to add value and space to your home without having to move to a bigger place. But hey, let's get real for a moment—these projects can have some hefty price tags attached. So, what exactly is draining your wallet during this transformation?
The biggest budget buster? Drumroll, please... It's usually altering the roof structure. Yep, modifying or replacing that key part of your home to make room can rack up costs quickly. Whether it's adjusting the rafters or lifting the roof altogether, these changes often require skilled labor and tons of materials, making it the most expensive bit of your project.
- Understanding Loft Conversion Basics
- Why Roof Structure Can Break the Bank
- Choosing the Right Insulation
- Navigating Building Regulations
- Smart Finishing Touches
- Tips to Manage Your Budget
Understanding Loft Conversion Basics
If you're thinking about a loft conversion, it's a smart move to get familiar with the basics before diving in. First thing's first, consider the type of conversion that works for your home and budget. The common types are roof light, dormer, and hip-to-gable. Each comes with its own price tag and level of complexity.
When it comes to the actual construction, you'll need to check if your loft is suitable for conversion. This usually involves looking at the height (most need a minimum of 2.4 meters), checking the roof structure, and thinking about access. If you plan to install a staircase, for instance, make sure there’s enough room without wrecking your current layout.
Most projects will require some level of planning permission. The good news? In many cases, loft conversions can fall under 'permitted development', meaning you won't need full planning permission. However, it’s still key to check with your local council to avoid any nasty surprises mid-renovation.
Don’t forget about building regulations. These ensure that the conversion is safe and structurally sound. These rules apply to the whole shebang—from structural changes to things like fire safety, insulation, and even the stability of your floors.
Think of a loft conversion as a complex puzzle. There are many pieces—like design choices, legal permissions, and structural changes—that need to fit together perfectly. Miss a piece, and it might cost you time, stress, and money. So, get these basics down to start your project off on the right foot!
Why Roof Structure Can Break the Bank
Alright, so you're diving into a loft conversion and suddenly your budget seems to be magnetically attracted to anything that involves the roof. Why does this part cost so much, you wonder?
Basically, when you're converting a loft, the roof structure often needs to be modified to make the space livable. There are different kinds of roof changes depending on what you're starting with. Got a low-pitched roof? You might have to raise it entirely. Rafters too close? Those need adjusting.
These changes aren't just about hammering a few nails. We're talking some serious work that often includes skilled labor, and skilled workers don't come cheap. They might need to add dormer windows or maybe even transform a hip roof into a gable style. These aren't small tweaks—they're major alterations.
Check this out: According to the National Association of Home Builders, altering the roof structure can eat up to 25-50% of your overall renovation costs. That's a big chunk of change, right?
Not to mention, there's a lot of red tape involved. You need to follow building regulations like ensuring structural integrity and proper fire safety, which often means hiring architects or engineers. This means more professional fees on top of everything else.
If you're tech-savvy, using roof load simulation software might help spot potential design flaws before you're knee-deep in construction. It could save you from spending money on surprise fixes.
So yeah, the cost of altering the roof structure can be sky-high, but knowing what to expect can help you plan better and hopefully save some cash where you can.
Choosing the Right Insulation
Picking insulation for your loft isn't just about keeping warm. It's about energy efficiency, soundproofing, and ensuring your new space is as comfy as your living room. When you're knee-deep in planning your loft conversion, you'd definitely want to get this part right.
First off, let's talk about the most common types you'll come across: mineral wool, rigid foam, and spray foam. Each has its pros and cons depending on what you need. Mineral wool is great because it helps with both thermal and acoustic insulation, plus it's fire-resistant. Sounds like a winner, right?
Then there's rigid foam, which offers excellent thermal insulation and adds structural strength. It's especially useful if you're working with a tight space where every inch counts. Spray foam pulls its weight by sealing gaps perfectly, but it can be a bit more expensive.
Now, how much insulation do you actually need? Here's a quick tip: Check your local building regulations. Most regions require a certain thickness for insulation to meet energy efficiency standards. Keeping up with these regulations not only keeps you in the green but also boosts your home's overall energy efficiency.
Feeling overwhelmed by choices? Look at it this way: investing in good insulation now can save you big on energy bills later. And who doesn't like saving money?
If you're a numbers geek, here's something for you. Below is a rough breakdown of potential costs and efficiency rates for these insulation types:
| Type | Approx. Cost per Square Foot | R-Value per Inch |
|---|---|---|
| Mineral Wool | $1.50 - $2.00 | 3.0 - 4.3 |
| Rigid Foam | $1.80 - $3.00 | 4.0 - 6.5 |
| Spray Foam | $0.44 - $1.55 | 5.0 - 6.5 |
By shaving a few dollars off energy costs each month, over the years, you could easily save more than you spent on the insulation. And isn't that a budget-friendly move?

Navigating Building Regulations
Ready to take on a loft conversion? Hold your horses a second—before you start swinging that hammer, you need to tackle those pesky building regulations. Yep, they can feel like a speed bump in your renovation race, but they're actually super important for keeping your home safe and sound.
So, what's the deal with these regulations? They're there to ensure your new space meets safety and energy efficiency standards, plus they're all about making sure your conversion doesn't affect the structural integrity of your place. It's like giving your project a seal of approval from the construction gods.
First, you might need to apply for Building Regulations Approval. This usually covers a range of checks, like making sure you’ve got a solid fire escape plan and that your floor strength can handle the new setup. Don't forget about sound insulation between your loft and the rooms below—no one wants to hear every step echoing through the ceiling.
Also, depending on the nature of your project, you might need planning permission if it changes the shape of your roof significantly. Good news? Not every conversion requires it. But just in case, it's best to get your ducks in a row by consulting with your local planning office.
Struggling to know what's mandatory? Here's a quick rundown:
- Structural stability: Ensure your floor and roof alterations are rock solid.
- Fire safety: You need proper escape routes and smoke alarms.
- Insulation: Meets energy efficiency standards.
- Ventilation: Proper airflow to avoid damp and condensation.
If this sounds like a lot to handle, consider hiring a structural engineer or a professional builder. They know the ins and outs and can help you keep track of what specs you need to hit. Remember, spending a bit upfront for the right advice can save you from costly mistakes down the line.
Here's a tip: always keep communication open with your local council. They’re not the bad guys but partners who help you see your home improvement dream come true while keeping everything safe and legal.
Smart Finishing Touches
Alright, so you've nailed down the big stuff and now it's time to get those smart finishing touches in place, making your loft not just usable but truly livable. It's the small details that can turn an average space into something amazing. Let's talk about some clever ways to put a cherry on top of your loft conversion without breaking the bank.
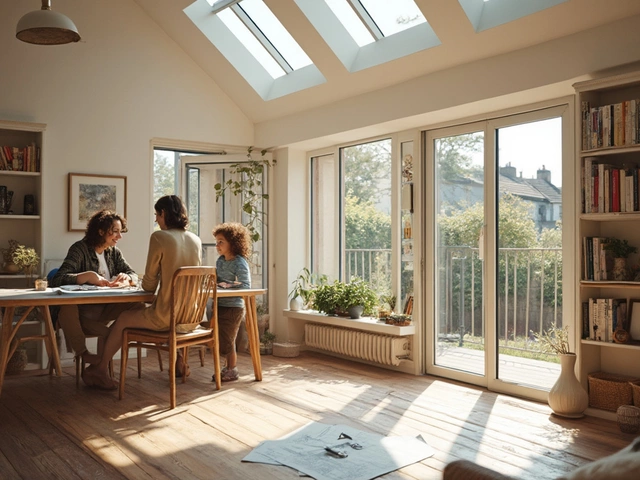
First off, think about lighting. Natural light is your best friend up here, so make sure you maximize it. Skylights are a popular choice, and they don't just look cool—they bring in tons of daylight, which can make your new room feel airy and spacious. But don’t stop there; consider LED spotlights or trendy pendant fixtures for evenings. They’re energy-efficient and can add that modern touch.
When it comes to flooring, you might want to opt for something durable and stylish like engineered wood. It's great for handling foot traffic and lends warmth to the space. If budget is a concern, quality laminate floors are a solid alternative, looking pretty sleek without the hefty price.
Now, let's talk storage. Using every inch of your roof's slope, bespoke shelving and built-in cupboards can provide ample storage without overcrowding the room. You can customize these to fit into awkward corners, making the most of every crevice.
Lastly—let’s not forget about temperature control. Since lofts can get chilly in winter and roasty in summer, investing in good insulation and ventilation is a must. Double-glazing windows and a decent HVAC system can save you from those dreaded seasonal peaks and troughs.
| Finishing Touch | Cost Range ($) | Benefits |
|---|---|---|
| Skylights | 800 - 2,400 | Increased natural light |
| Engineered Wood Flooring | 5 - 10 per sq ft | Durability & style |
| Custom Storage Solutions | 500 - 3,000 | Maximized space usage |
| Insulation & Ventilation | 2,000 - 4,500 | Temperature control |
So, keep these in mind when you’re adding those final touches to your transformation. You’ll be giving your loft an extra layer of comfort and functionality—making it a place you'll love to spend time in. Remember, clever choices now can save you bucks and hassles down the road. Enjoy your new space!
Tips to Manage Your Budget
So you're all set to create that dreamy loft space, but you want to do it without breaking the bank. Good thinking! A loft conversion can be pricey, but with a few savvy moves, you can keep those costs in check without sacrificing quality.
First off, always get a few different quotes from contractors. Prices can vary wildly, and a little comparison shopping can save you a bundle. Plus, always check their credentials and reviews. You want pros who are both skilled and reputable.
Consider the timing of your loft conversion. Believe it or not, scheduling your project during the off-peak months, like late winter, can sometimes land you better deals.
Next up, think about what you can realistically DIY. Some tasks like painting or installing simple flooring might be within your wheelhouse, and doing them yourself can save on labor costs.
Also, be conscious of the materials you choose. High-end doesn't always mean better when it comes to materials. Sometimes mid-range options provide great durability and aesthetics without the crazy price tag.
To give you an idea of how your choices can affect costs, here's a quick comparison:
| Material | Average Cost (per square foot) |
|---|---|
| High-Quality Hardwood Flooring | $10-$14 |
| Mid-Range Laminate Flooring | $3-$5 |
| Basic Carpet | $2-$4 |
Lastly, don't forget about government incentives or loans that might be available for home improvement projects. Sometimes these opportunities can ease financial strain more than you'd expect.
Carefully planned decisions and a strategic approach mean you won’t have to sell a kidney to get that stunning loft transformation!